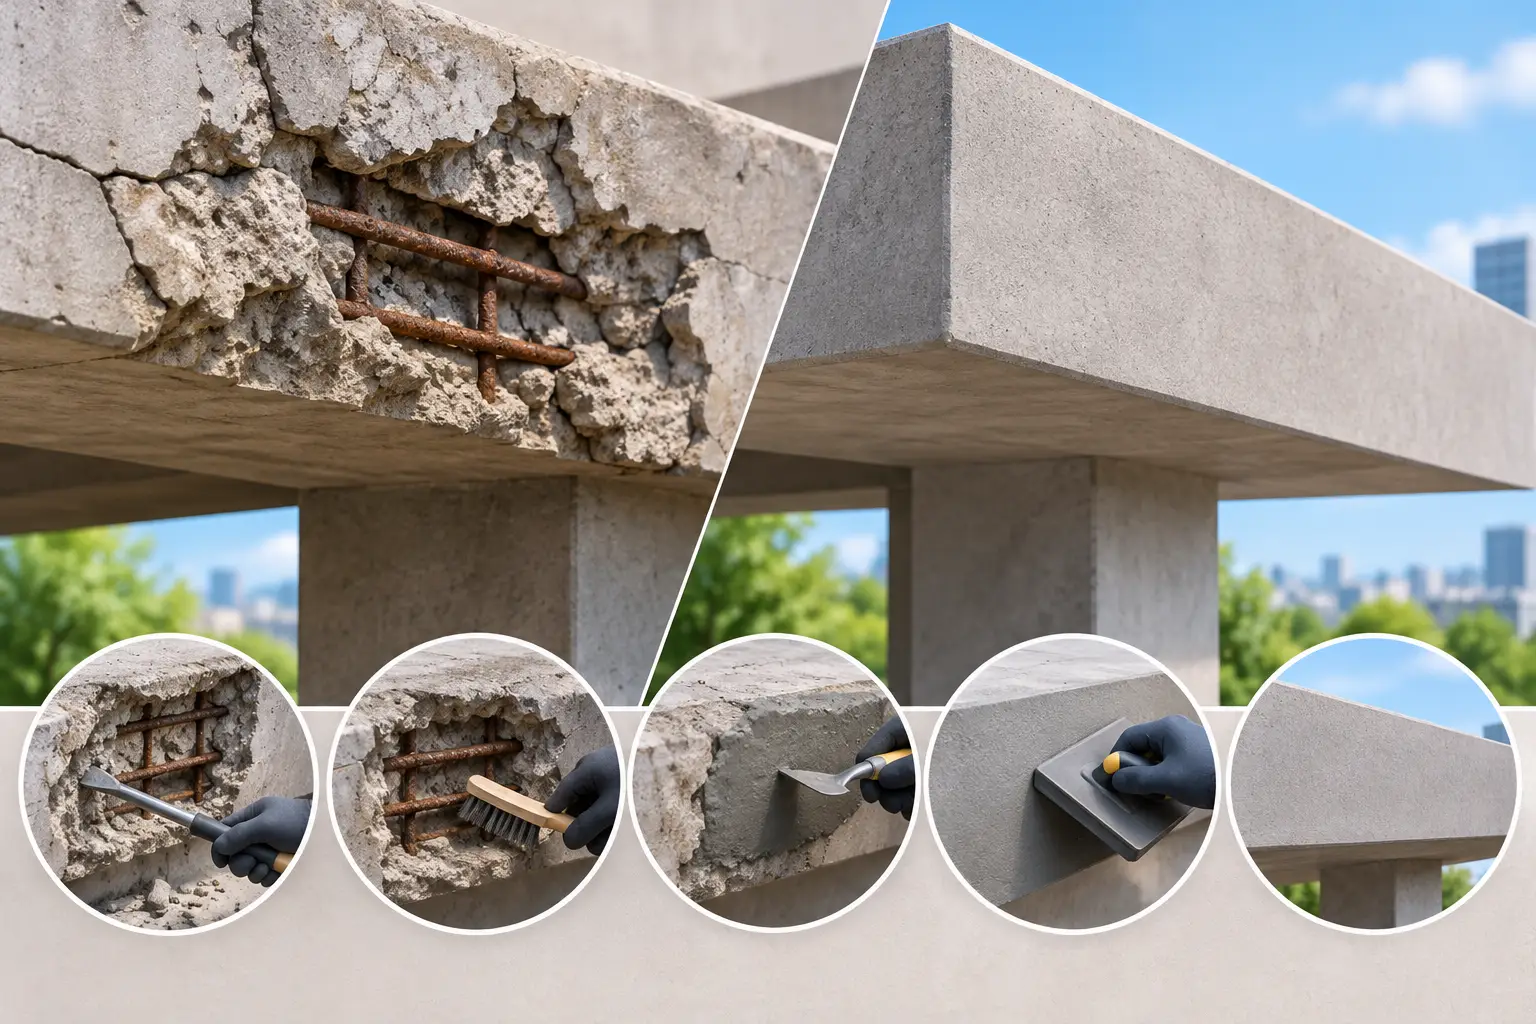
Concrete that is flaking, chipping, or breaking away is more than a surface-level eyesore. Left alone, spalling can expose reinforcing steel, allow water deeper into the slab, and turn a manageable repair into a replacement project. Knowing how to repair concrete spalling starts with one rule: do not cover damaged concrete until you know why it failed.
For homeowners and property managers in the Coastal Bend, moisture, salt air, drainage problems, shifting soils, and heavy traffic can all contribute to concrete deterioration. A repair that looks good for one season but does not address those conditions will usually fail again. The right work removes weak material, restores a sound surface, and corrects the source of the damage where possible.
What concrete spalling looks like
Spalling occurs when the top layer of concrete separates from the sound concrete below it. It can show up as shallow flakes, rough pits, pop-outs, crumbling edges, or larger sections that have broken away. On a driveway or parking lot, it often begins where water sits after rain. On steps and elevated slabs, it may start along exposed edges and joints.
Not every chipped area means the entire slab is failing. A small, isolated surface defect may be repairable. Widespread deterioration, deep cracking, or rust-stained concrete deserves a closer evaluation before money is spent on patching.
The most common causes include poor finishing during the original pour, excess water in the concrete mix, inadequate curing, freeze-thaw exposure, deicing chemicals, poor drainage, impact damage, and corrosion of reinforcing steel. In South Texas, coastal moisture and chlorides can be especially hard on concrete near the water or in areas exposed to salty air.
How to repair concrete spalling step by step
A durable repair depends on preparation more than the patch material itself. Rushing through demolition, cleaning, or curing is why many repairs separate around the edges within months.
1. Determine whether the slab is a repair candidate
Start by checking the damaged area and the surrounding concrete. Tap the surface with a hammer. Solid concrete produces a sharper sound, while delaminated concrete often sounds hollow. Mark all loose, hollow, stained, or cracked areas so the repair extends beyond what is visibly missing.
A patch is generally appropriate when the damage is limited and the slab remains stable. If the concrete is heaving, sinking, severely cracked, or spalling across a large percentage of the surface, replacement may be the better long-term decision. Patching a failing slab can delay a necessary project, but it will not restore structural integrity.
Extra caution is needed around foundations, retaining walls, elevated walkways, loading areas, and commercial traffic lanes. Those surfaces may carry structural loads, and improper removal can create a safety issue.
2. Remove all unsound concrete
Use a hammer and cold chisel for a small repair, or the appropriate mechanical tools for larger areas. Remove every loose section until you reach clean, solid concrete. Do not stop at the visible edge of the spall if the adjacent concrete is hollow or weak.
Square or slightly undercut the repair perimeter when practical. A patch feathered to a paper-thin edge is likely to chip off. Most repair products require a minimum depth, often around one-quarter inch to one-half inch, but the product instructions control. Deep repairs may require a different mortar or placement method than shallow surface repairs.
If reinforcing steel is exposed, remove loose concrete from behind and around the bar so it can be cleaned and properly coated. Do not cut or remove reinforcement without professional direction. Steel may be performing an important structural role even when the surrounding concrete has deteriorated.
3. Clean the repair area thoroughly
Concrete repair material needs a clean, sound base to bond. Remove dust, sand, loose particles, paint, oil, and residue with a wire brush, shop vacuum, pressure washer, or other suitable method. If oil contamination is present, it must be treated fully. A patch placed over oily concrete will not hold.
After washing, allow standing water to drain. Many cement-based repair mortars bond best to a saturated surface-dry condition. That means the concrete is damp beneath the surface but has no puddles or sheen. Read the repair product label before mixing because some polymer-modified materials have specific moisture requirements.
For rusted reinforcing steel, clean the steel to remove loose rust and scale. Depending on the repair system, a corrosion-inhibiting coating may be applied before the patch mortar. This matters because untreated steel corrosion can continue expanding and push the new repair loose from the inside.
4. Choose the correct repair material
Do not use standard bagged concrete mix for every spall. Large aggregate in regular concrete makes it difficult to consolidate in shallow repairs, and it may not bond well at thin edges. Use a cementitious concrete repair mortar designed for vertical, overhead, or horizontal applications as needed.
For a driveway, patio, walkway, or parking surface, select a product rated for horizontal repairs and the expected traffic. For a wall, curb, step face, or slab edge, use a non-sag repair mortar that can stay in place without slumping. A deeper repair may need to be built in lifts rather than placed all at once.
Color can be a consideration on decorative concrete, but performance should come first. Even a well-matched patch may weather differently than older concrete. If appearance is a priority, a larger resurfacing or coating system may be worth discussing after the structural repair is complete.
5. Mix and place the patch correctly
Follow the manufacturer’s water ratio exactly. Adding extra water may make the material easier to spread, but it weakens the repair and increases shrinkage. Mix only as much material as can be placed within its working time, especially in hot, windy weather.
Apply the bonding agent if the repair system calls for one. Then press mortar firmly into the prepared area, working it into corners and around exposed reinforcement. Consolidate the material to eliminate voids. Bring the repair slightly above the finished surface, then strike it off and trowel it to match the surrounding grade.
For exterior flatwork, match the existing texture. A slick trowel finish can become slippery when wet and may look out of place beside a broom-finished driveway or sidewalk. Recreate control joints if the repair crosses an existing joint, but do not bridge an active expansion joint with rigid patch material.
6. Cure the repair and protect it from traffic
Fresh repair mortar needs controlled curing to gain strength. Protect it from direct sun, wind, rain, and foot or vehicle traffic for the period stated by the manufacturer. In Corpus Christi-area heat, rapid moisture loss is a real concern. A patch that dries too fast can shrink, crack, or lose bond before it has properly cured.
Keep traffic off the area until the product has reached its stated service strength. A driveway patch may feel hard within hours, but that does not mean it is ready for vehicle loads. Respecting cure time is one of the simplest ways to protect the repair investment.
Fix the condition that caused the spalling
A patch addresses the damaged area. Long-term results depend on correcting the conditions that allowed water, salt, movement, or corrosion to do the damage.
Check whether downspouts discharge onto the slab, irrigation oversprays the same edge every day, or low spots hold water after rainfall. Improve grading, extend drainage away from the concrete, and keep joints sealed where appropriate. On coastal properties, periodic cleaning can reduce salt buildup. If reinforcing steel corrosion is the cause, the repair scope may need to include more than the visibly damaged spot.
Avoid using harsh deicing products when freezing weather occurs. If a concrete surface is repeatedly exposed to chemicals, heavy equipment, or standing water, a suitable protective sealer may help after repairs have fully cured. Sealer is not a substitute for sound concrete or drainage, but it can add a useful layer of protection.
When to call a concrete repair contractor
Small, shallow, isolated spalls can be manageable for a capable property owner. The job becomes more complicated when damage is deep, widespread, near structural elements, or tied to settlement and drainage failures.
Call a qualified concrete contractor when you see any of these conditions:
- Exposed or heavily rusted reinforcing steel
- Cracks that continue through the slab or wall
- Concrete that is sinking, heaving, or separating from adjacent areas
- Repeated spalling after previous patches
- Large damaged areas in a driveway, parking lot, foundation, retaining wall, or commercial walkway
A professional assessment can determine whether targeted repair, resurfacing, partial replacement, or full replacement makes the most financial sense. For commercial properties, it also helps address trip hazards and liability before the damage worsens.
Haylo Construction handles concrete repair work with the local conditions in mind, from residential driveways and patios to commercial slabs and parking areas. The goal is not to sell a patch where replacement is needed. It is to recommend work that holds up under traffic, weather, drainage conditions, and the demands of the property.
A sound spall repair should blend practical preparation with disciplined finishing. Remove the weak concrete, use the right material, protect the cure, and stop water from returning to the same problem area. That approach gives the repaired concrete a fair chance to perform for years instead of becoming another short-term patch.